
Previous entry:
May 2007
Next Entry:
August 2007
Home:
One Truth For All
| Sun | Mon | Tue | Wed | Thu | Fri | Sat |
|---|---|---|---|---|---|---|
| 1 | 2 | 3 | 4 | 5 | ||
| 6 | 7 | 8 | 9 | 10 | 11 | 12 |
| 13 | 14 | 15 | 16 | 17 | 18 | 19 |
| 20 | 21 | 22 | 23 | 24 | 25 | 26 |
| 27 | 28 | 29 | 30 | 31 |
Archives
July 30, 2007
Laser Fun
I spent some time today at Techshop, working with one of the laser cutters there. On Friday evening, Noel and I took the intro to laser cutting class and I had spent much of the weekend working on some drawings to try out.
Techshop has two laser cutters: an Epilog Summit and an Epilog Helix. The Summit has a 22" x 17" cutting area (although larger materials can fit into the machine; I was using 24" stock), while the Helix has a 24" x 18" cutting area (and that's about as large as the material can be). The Helix is a newer, more powerful, faster machine. The Summit is more often available, and as I happened to need a lot of time, it was the one I used today. I spent about six hours on the system, and stopped because I was going to go crazy if I had to spend another minute there watching the machine sloooooowly cut the wood.
What follows are some of my notes on the Summit and the materials I was using.
Technorati Tags: architecture, design, model building, power tools
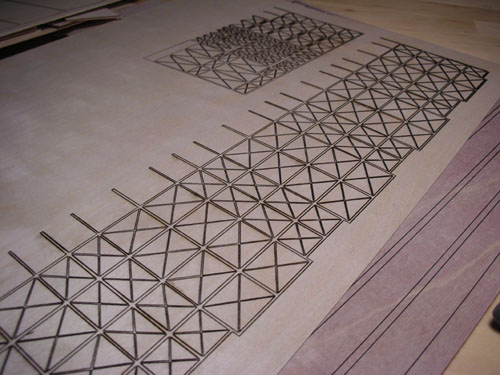
The first note is that the Summit has no real registration tools. You kind of put your material in there and hope it's in the right spot. And it was not always in the right spot, even with some very careful alignment. I had a lot of material and ended up wasting much of it to misalignment; in the future I will bring an alignment paper with me and tape it down. Also, more material. Also, less tight layouts on the outer edges; the inside layout should be tight (pieces within 1/4" of each other), but 1/2" or more of room around the edges is a good idea with this particular machine.
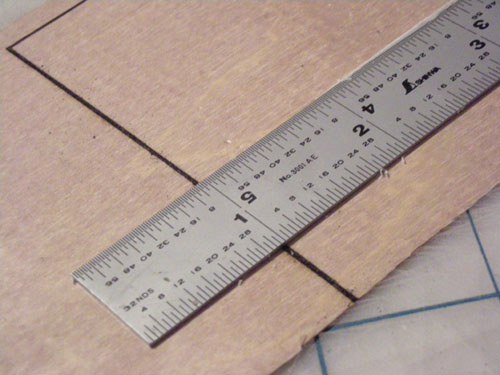
Second note about the Summit: its focus is not very consistent, and that makes a huge difference in the cutting quality. Some of that was due to the materials I was using, which were bending. But some of it was the machine itself.
See, here is a cut that was slightly out of focus. It's wider than 1/32":
Whereas this cut was in tight focus, and is narrower than 1/64".
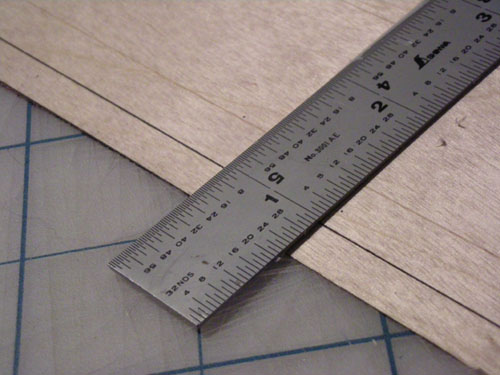
A difference like that in a design as intricate as mine is a deal breaker. I think I will try the Helix machine next time to see how I can improve this situation.
Third note: when cuts of varying depth need to be made, it's useful to know that the printer driver will interpret every line in the drawing literally: if there are four lines on top of each other, it will go over the same spot four times, making a deeper cut. This would allow you to make deeper cuts in some areas and just score the material in other areas.
Fourth note: one thing I learned but did not have time to fix was that the machine doesn't automatically connect lines that are adjacent to each other. As you can see here, there are a lot of odd little gaps in the cuts, where the vector drawing seemed to meet up but apparently did not do so closely enough for the printer driver. I need to experiment to see why that happened.
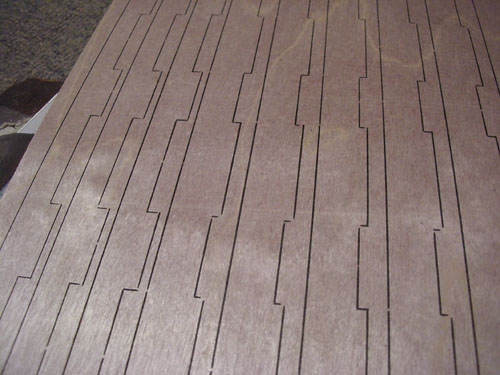
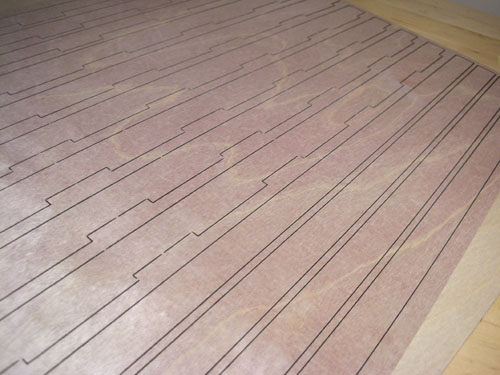
I used three kinds of wood: 1/64" birch plywood, 1/32" birch plywood, and 1/16" basswood. The birch plywood had a high sheen to it, and took a lot of passes to make a decent cut. It was also thin enough to curl and distort the cuts.
Here's one sheet of the 1/64" birch plywood. I ran this one three times, and you can only barely see the design on the larger rectangles (that one place where the design shows is where the line thickness was wrong and what ought to have printed as a raster (etching) printed as a vector (cutting).
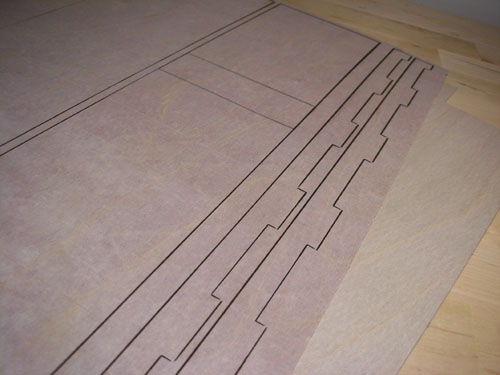
Here's the sheet of 1/32" birch plywood. I did two passes on this one at a much higher power and slower speed, and still didn't get all the way through. Also, the lines that had been two lines bled together because of the kerf; the ones that are clearly two lines are about as close as you can get the cuts and not lose your material.
Here's another piece of 1/64" plywood. I was cutting out a series of pieces, and this worked OK. This one had four passes at a medium level, and was not cut through.
I think the finish level on the wood makes a big difference. This piece of 1/16" basswood cut through perfectly. No trouble; I ran it only once at a level that had barely made a dent in the 1/64" plywood, and it cut right through the first time.
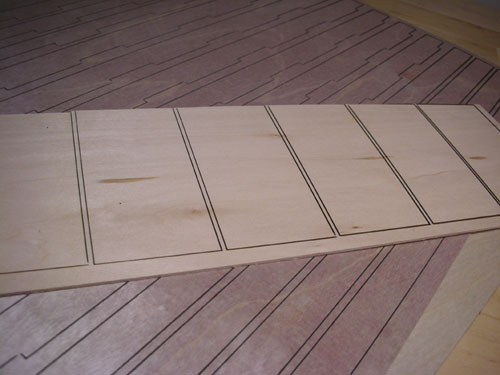
There are two major differences between the birch plywood and the basswood: the birch plywood is denser and tougher -- plywood generally is tougher and denser than unlaminated wood. And the basswood has a rough, porous surface that lends itself to burning.
In sum, I'm definitely happy with what I have learned, but I need to work on this some more with different material (I think museum board or another heavy paper would be good) and maybe using the newer machine. I also need to modify my drawings to work better for the machine.
# Posted by ayse on 07/30/07 at 11:16 PM | Comments (0)
July 19, 2007
Gardening and Global Warming
Yeah, I should be working on my thesis right now and instead I was reading a garden blog and procrastinating. I prefer to think of it as "cogitating." Anyway, this brief note got me a bit riled up. The gist of it is that since 40% of carbon emissions come from tilled soil, home gardeners should not till. And possibly mulch will hold carbon in.
There are a couple of problems with that thesis that seem fairly obvious to me. First of all, that 40% of carbon emissions is not coming from home gardeners. It's coming from large-scale agriculture. Whether I till my garden or not is a miniscule amount compared to the massive problems of large-scale agriculture. Second, mulch itself emits carbon, as do all decomposing organics, and its production causes carbon emission.
So the entire thesis misunderstands how carbon emissions happen. But behind it is a belief that tilling is bad (and I generally agree there, except in cases where you are tilling organic material into infertile soil for crops, which is why most people till their gardens) and mulch is good.
Mulch, alas, is not the wonder-drug of gardens. For one thing, it keeps the upper layer of soil moist, and the upper layer of the soil is not where the roots should be -- the lower layers of soil don't dry out as fast as people think they do unless a plant uses up the water there, and in that case mulch is not going to help you. Mulch attracts pests, or worse it carries pests from wherever it came from. It absorbs moisture that could go into the root zone and then allows it to evaporate, wasting water. It's doesn't even really stop weeds, especially our pernicious Bermuda grass. And most of all, it is generally in the process of decomposing, which uses resources your plants might want.
Technorati Tags: gardening
# Posted by ayse on 07/19/07 at 2:56 PM | Comments (0)
July 12, 2007
Site Model
Last night I finished making the last of the little scaled blocks that represent buildings on my site model, and this morning and afternoon I've been assembling the freeway down the center.
My actual site (well, sites) is the area under the six large warehouses: two on the far side of the freeway and four on the near side. They're fairly easy to see in this photo, as they're the fattest buildings on the site, and all the same size.
The blocks that are those warehouses are not attached, so I can put my final model on the site, too.
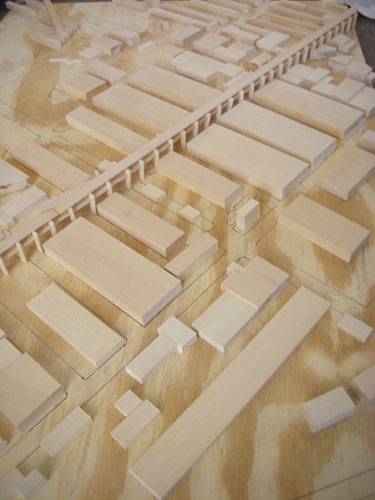
I'm still in mid-assembly on that freeway; there are two off-ramps that I need to assemble and attach, but the rest of the site has to finish drying before I can fiddle with it some more.
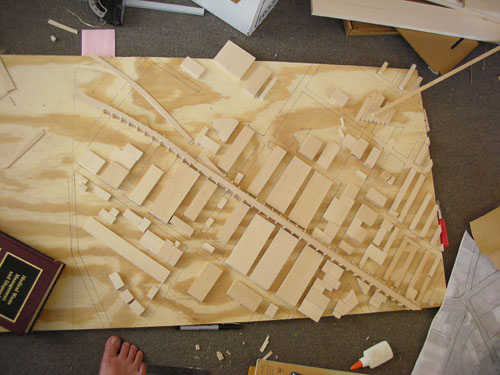
When I finish the freeway, I'm going to trim the long end off the board, and trim the overhanging buildings, too. Then I need to clean the apartment, because it's a holy mess. I would have worked on this in the studio, but there's no room in there these days.
Technorati Tags: model building, school, thesis
# Posted by ayse on 07/12/07 at 3:56 PM | Comments (0)
Some Garden Planning
No, I have not died, but I've been working on a site model for several days now, perhaps one might even say I've been working on it for four weeks, if you count numerous trips to measure things like building heights and the size of the freeway and so on.
But I will not talk about my thesis, because it's getting boring even for me to listen to me talk about it. Instead, let me show you a couple spots in the garden that need serious work:
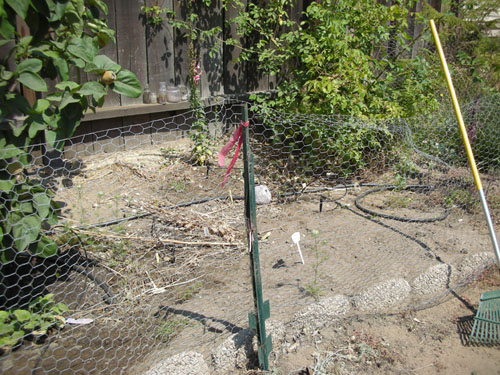
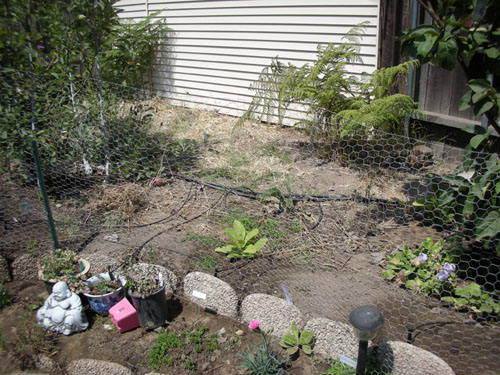
These are the beds on either side of the quince tree, and they are horrible at this time of the year. In the spring they have ranunculus and allium growing in them, but now, not so much. Lots of neat weeds, though. So I'm kind of considering how to plant them out.
Technorati Tags: design, gardening
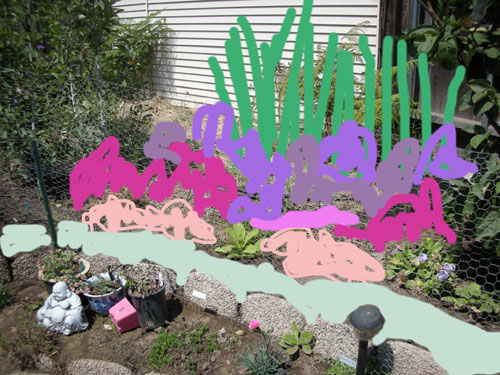
Here's how I'm thinking about it right now. The drawings are kind of crude, because I didn't want to spend too much time on them. I want to find some kind of drippy heat-tolerant ground cover to go in the front, where the crocus come up in the spring and there's not much good soil. Behind that, the peachy-pink is small plants, maybe 6-8" tall, increasing in size until we get to something very vertical (right now I have snapdragons and a few foxglove back there; I should plant more).
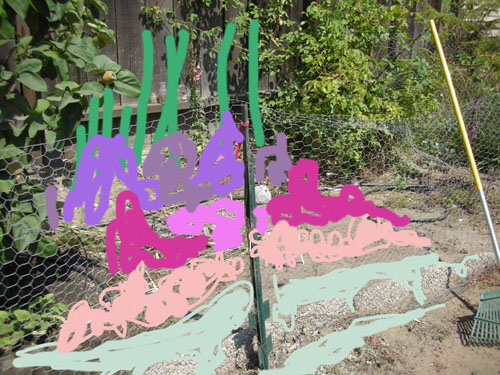
And no, the colours are not what I was thinking of using. Just a little code for height and shape. I'm trying to be more orderly about my planting than I have been in some other beds (the salvia bed is a total mess, but a charming one).
The frustrating thing is that I really can't plant anything there until spring, because at this point in the year new plants tend to die off rather than establishing nicely. Of course, it's not like I have loads of free time, either.
Yeah, so that's what I've been thinking about in between thinking about my building and doing endless irrigation plumbing.
# Posted by ayse on 07/12/07 at 1:09 AM | Comments (0)